Mini Monets and Mommies: March 2015

Sunday, March 29, 2015

Kids' Felt Board Book Art Activity

It’s a DIY felt board and a children’s book all in one! I’m a fan of making my own felt boards. It’s so simple, and the kids always enjoy it. When I used to teach community art programs, I always brought along my homemade board for the children to use. They could puzzle out the pieces, creating their own stories, building fine motor skills and learning how to problem solve. The kids also were able to develop basic math skills, playing with patterns, shapes and the part-to-whole relationship.
Kids' crafts

This kids’ art activity takes the traditional felt board for a twist and gives your child the chance to make her own foam book that features page after page of felty fun! The best part? Your child can put together her own story, take it apart and then start over again.

Here’s What You’ll Need:

·        3 or more 12x18-inch craft foam sheets

·        8x10 craft felt sheets

·        Clear-drying school glue

·        Scissors

·        Yarn

Here’s What to Do:

1.     Stack the foam sheets together.

2.     Fold the foam in half, book style.

Book-making activity
3.     Poke at least three holes all the way through all of the foam sheets, about one-inch away from the fold. You can use a hole punch, but this is tricky due to the foam’s thickness. I used the end of the scissors. Do not allow your child to use the scissors in this way. Do this step for her, being careful of the sharp edge of the scissors.

4.     Push the end of a piece of yarn through the bottom set of holes. ‘Sew’ the yarn all of the way up the side of the book.

Kids' art
 
5.     Tie the yarn at the ends to bind the book together.

6.     Cut the felt to fit the pages of the book.

7.     Glue one piece of felt to each page of the book.

Book Art
 
8.     Cut out a felt rectangle. Size it to fit on the bottom half of the book’s cover.

9.     Glue the sides and bottom of the rectangle to the book, making a pocket.

10.  Create shapes. Cut different colors of felt into circles, squares, rectangles and triangles.

11.    Store the shapes in the front pocket.

Art Activity
 
12.  Take out the shapes and have your child create pictures on the pages. The pictures can tell one story or fit a theme. Your child can also create individual artworks.
 
Kids' Book

When she’s done, take the felt pieces off, pack them up in the pocket and start again later!
Children's book

Are you looking for more kids’ crafts? Follow my Pinterest board for ideas!
Follow Mini Monets and Mommies's board Creative Kids Crafts on Pinterest.

Friday, March 27, 2015

Candy Sushi for Passover

Candy sushi? Passover doesn’t come with the ooey, gooey treats that Easter does. Or does it? Speaking in a totally non-religious sense, one of my favorite parts of Passover as a child was the jelly slices. C’mon, you know what I’m talking about. Those Manischewitz-made gummy-ish slices of pure sugar—that are then coated in another layer of sugar. Yum!

Kosher Passover


Not that these sweet treats aren’t good enough as is, but why not make them into something else? With a few other Passover delights, your child can help you to whip up a batch of candy sushi. This is super-simple and involves no cooking (unless you count microwaving—which isn’t really cooking).

You can make a variety of Passover candy sushi or pick one to focus on. I’ve included a few different ideas, but brainstorm with your child to come up with a few of your own unique ‘recipes’.

Here’s What You’ll Need:

·        Jelly slices

·        Coconut-covered marshmallows (Manischewitz makes kosher ones)

·        Macaroons – The kosher kind, not the fluffy French ones.

·        Taffy strips

Here’s What to Do:

To make rolls—

1.     Stretch out a piece of green taffy. If it won’t budge, pop it into the microwave for a few (and I mean a few) seconds. Do not allow your child to touch the hot taffy. Watch the candy closely so that it doesn’t bubbles.


2.     Press a marshmallow onto one end of the taffy. Squish it flat.
 
Passover treat

3.     Slice a jelly into strips.
Fruit treat

4.     Place the strips onto the marshmallow.
 
Treat recipe

5.     Roll the marshmallow around the jelly pieces, pressing it together at the ends.
 
Kids' treats


6.     Roll the whole thing up in the taffy strip, smooshing it closed at the edges.
 
Passover Desserts


Other ideas—

1.     Press a coconut marshmallow flat.

2.     Cut the jellies into ling, thin triangle-shaped slices.

3.     Put two slices on top of the marshmallow.

4.     Pull and roll a piece of warm taffy into a thin tube.

5.     Wrap the candy sushi up with the taffy by pressing it around the middle.
 
Kids' cooking

Or try

1.     Slice the bottom of a macaroon off.

2.     Cut the ‘rind’ from a green fruit jelly slice.

3.     Slice another colored jelly into strips.

4.     Put the strips on top of the macaroon.

5.     Cover with the rind in the middle.

Serve the candy sushi up on one plate, pack them in a container to give away to a friend or eat it right away. Remind your child that the taffy and jelly candies are sticky. Very young children should not eat this treat as it presents a choking hazard.
Holiday Food

Are you looking or more desserts? Follow my Pinterest board for ideas!
Follow Mini Monets and Mommies's board Great Desserts on Pinterest.

Thursday, March 26, 2015

Sweet Easter Peep Recipes

Easter Peeps. Who doesn’t absolutely adore the gooey marshmallow treats bathed in a colorful sugar coat? Ok, so there are probably plenty of you who can’t stomach the super-sweet treats. But, if you share my love for the chicks and bunnies (or, more likely, your child does) let’s take a look at a few fun recipes.

Peeps Recipes
I use the word ‘recipes’ loosely here. After all, we are talking about Easter Peeps. Recently I made over-stacked s’mores and chocolate crème-filled egg cupcakes with the marshmallow candy. The little treats that I’m about to outline couldn’t be easier not to bake. Your preschooler or young child can create these sprinkle-dipped goodies with very little help from you.

The Easiest Easter Treats

Here’s What You’ll Need:

·        Peeps

·        Frosting

·        Sprinkles

Here’s What to Do:

1.     Spread the frosting onto the sides and back of the chick where the wings and tail go (you’re making frosting feathers).

Kids' recipe
2.     Add sprinkles!

Sprinkle recipes
Cute Cars

Here’s What You’ll Need:

·        Peeps

·        Sprinkles

·        Jelly beans

·        Frosting

Here’s What to Do:

1.     Cover the entire chick with frosting. Now it looks a bit like a VW Bug!

2.     Add sprinkles over the entire Peep.

3.     Press two jelly beans on each side as wheels and one on the front as the windshield.
Holiday Treats
 

Umbrellas

Here’s What You’ll Need:

·        Peeps

·        Sprinkles

·        A cupcake liner

·        A plastic straw

·        Frosting

Here’s What to Do:

1.     Frost the Peep.

2.     Cover it with sprinkles.

3.     Press the straw through the bottom of the Peep.

Holiday Treats
 
4.     Push the bottom of the straw through the center of the cupcake liner.

5.     Move the cupcake liner all the way up to the top.

Easter Activity
 
Are you looking for more Easter desserts? Follow my Pinterest board for ideas!

 
Follow Mini Monets and Mommies's board Great Desserts on Pinterest.

Wednesday, March 25, 2015

Preschool for Grownups at Home: Art Activities You Need to Try

Preschool for grownups? Yep, that’s a thing. Two Brooklyn-based entrepreneurs have created an adults-only ‘preschool’ program that caters to those who need to rekindle that magic of being young at heart. While I can’t say that this idea would go gangbusters in my little minivan-filled, paddle tennis-playing suburb, I can certainly see the appeal.

Preschool adults
Who doesn’t want to go back to their youth? I’m not talking about the brace-face, pimply, totally awkward days of seventh grade (I got glasses and braces at the same time, and was about a foot taller than all of the boys in my grade). I mean those princess dress-wearing days of preschool. To tuck the work emails away and put all adult responsibilities on hold for a few hours is a precious commodity that many of us don’t have the luxury of doing. How often to you turn your cell off? Stop checking emails? But social media on hold? If you just burst out laughing at the thought of doing any of those things, you aren’t alone. That’s part of the reason why a preschool for grownups sounds so darn good to so many of us adults. It’s freeing, inspirational and puts you back in touch with who you were at a much simpler time.

If the whole go back to preschool thing is starting to sound good right about now, you don’t have to jet off to NYC just to take a try at it. I usually write about kids’ art activities. But, today it’s all for you! I know, I know – you spend 78 percent of your day covered in goo, gack and what was supposed to be DIY finger paint (but, really turned our looking more like oatmeal) already. So, why do art in the afterhours? I’m all for helping the kiddos out with their crafting, but isn’t it really all about them? Now it’s your turn. Whether you put on a suit and head off to the office all day or you’re at home with the kids in your yoga pants, making time for your own preschool for grownups is a way to relax, de-stress and forget about your mortgage, taxes and whatever else is cluttering your mind. I’ve put together a list of a few artsy activities that will make you feel young again.

Art Activities
 
Before you head back to preschool (mentally, not when you drop your 4-year-old off in the morning) remember: BE A CHILD! Don’t act like one, don’t pretend to let go. Really, truly let go and enjoy the process of creation. Forget about the mess you’re making, and stop worrying that you’ll chip your manicure. Throw down a tarp, newspaper, a garbage bag or whatever else you need to make yourself feel better about the impending clean-up. Turn your cell off, or at least turn the sounds off and put it somewhere you can’t see it light up when you get a call, text or email.

No we’re ready to make some preschool-inspired art. I always tell parents that when it comes to their kids’ art, it’s all about the process and not so much the product. I stand by this for adult-made art. Don’t worry about making ‘something’ or a picture. None of these requires an MFA in studio arts to create. Just enjoy!

Clay paint. This is an easy one if you’re still slightly afraid of the mess. Instead of finger painting, smooth modeling clay onto a piece of cardboard. Same motion, equally as relaxing, but no spills.

Glitter and glue. Draw squiggles, circles, zig-zags or anything else with clear-drying school glue onto a piece of paper. Sprinkle gobs of glitter on top and shake off the excess. Keep on repeating the process until you’re all sparkled out.

Finger paint plus. Are you ready for the preschool staple yet? You can start with a basic finger paint activity. Step it up by adding glitter, craft sand or just about anything else you want to the tempera. Toss in a teaspoon of baby oil for a moisture-rich slick feel or add course sugar crystals for a scrubby texture.

Shaving cream paint. Use your hands or a paintbrush to mix up a batch of DIY puffy paints. Little kids love this, and so should you! Drip some tempera into pools of shaving cream and paint a textured masterpiece.

Torn-paper collage. You have no idea just how relax tearing pieces of paper up can be until you try it. Tear up tissue paper and glue it onto a piece of card stock, collage style.

Craft Project
 
Color-mixing. Make your own rainbow by mixing paints. Name the colors that you make with the most creative titles you can think up.

Mixed-media buffet. Set out a buffet of all kinds of art materials for yourself. Use paint, glue, craft feathers, sequins, markers, oil pastels and anything else you have on hand. Put it together on a piece of cardboard in any way that you want to.

A preschool for adults is kind of a genius idea that I wish I would have thought of. Sure, we don’t all have this type of program down the street. But, that doesn’t mean you can’t ‘homeschool’ yourself. Put the kids to bed, go on a technology fast and let your inner child loose.


Easter Peeps Get Crafty: Kids' Painted Sculptures

What can you do when Easter peeps go stale? You could toss them in the trash, you could try cutting them up with a fork and knife (I don’t recommend this), you could use them as oddly shaped golf balls or you could use them for your child’s art activities. Last year we used the marshmallow, sugar-covered sweet treats to make picture frames. This year we’re using them to make super-simple sculptures!

Easter Peeps
 
This kids’ craft couldn’t be easier, and as a bonus it’s perfect for building fine motor skills. Your child can go all-out and finger paint a color-mixing – well, mess. Or, she can create a patterned design. One way that we decorated the little Easter chicks was to turn them into famous artist-inspired works of art. Take a look at our Monet’s Water Lilies peep sculpture.

Here’s What You’ll Need:

·        Stale Easter peeps – If the chicks aren’t very solid, pop them into the freezer. Painting a mushy marshmallow treat is far from easy.

·        Tempera paint

·        Paintbrushes, cotton balls or any other ‘painting tool’ that your child wants to use.

·        Clear-drying school glue

·        Optional: Glitter

Here’s What to Do:

1.     Pour the paint into pools on a palette (or use my favorite – a piece of wax paper).

2.     Dip a brush, a cotton ball or any other tool into the paint. Your child may also choose to finger paint the peep.

Paint Project


3.     Paint away! Your child can create her own design or try a theme. We made a Monet themed chick, but your child could try polka dots, a Jackson Pollock paint splatter, swirly whirls or make color blocks. She can also imagine her own creative paint idea!

Peep chick
 
4.     Wait for the paint to dry.
Chicken crafts
 

5.     Coat the Easter sculpture with a coat of clear-drying school glue. This adds a layer of protection and gives the paint a special shine.

Kids' crafts
 
6.     Optional: Sprinkle glitter over the glue (your child doesn’t even need to add paint is she tries this technique).

Craft glitter
 
Are you looking for something else to do with the peeps that aren’t stale yet? Try our:

Holiday Desserts

Or

Kids' recipes

For more kids Easter crafts, follow my Pinterest board!
Follow Mini Monets and Mommies's board Easter Crafts for Kids on Pinterest.

Monday, March 23, 2015

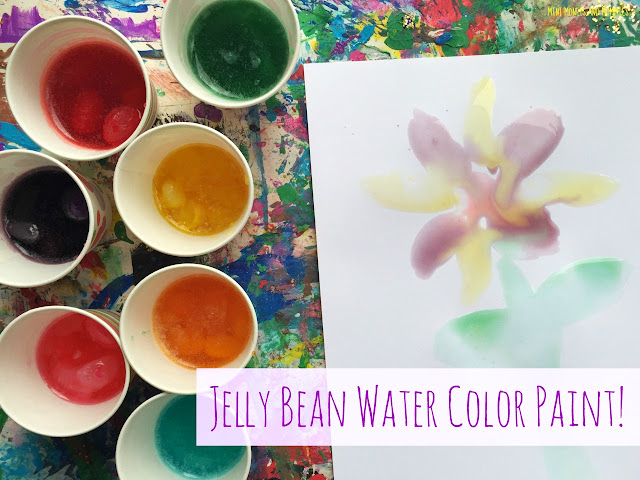
Easter Jelly Bean Water Color Paints for Kids

Jelly beans are more than tasty Easter candy treats for your kids! Admittedly, I enjoy candy much more than my son. Not that he doesn’t eat it, but when we pop open a bag of jelly beans it’s me who is eating the majority of it. That said, this time I decided to use the candy for a water color paint project (instead of letting it go to my hips).

Water colors


About a million years ago when I first started teaching children’s art classes I thought I was a total genius for ‘inventing’ scented Kool-Aid painting. This is kind of the same idea – your kids get a super-sweet smelling paint from something that should be food (kind of, at least). It also adds in a little bit of science too. Before you make the paints, ask your child a few open-ended questions such as:

·        What do you think will happen to the jelly beans when we add them to water?

·        Why do you think that will happen?

·        What do you think jelly beans are made from?

·        How do you think we are going to paint with jelly beans?
Painting craft

As you go along with the activity, keeping the questions coming. For example, “What’s in the water?” (the waxy coating on the jelly beans comes off in the water) or, “Why are the jelly beans turning white?” You can also study the make-up of the beans beforehand. There are a few different types of jelly bean-making processes (one of them includes beetle byproducts!).

And, on to the art-making…

Here’s What You’ll Need:

·        Jelly beans in bright colors

·        Paper

·        A water color paintbrush

Here’s What to Do:

1.     Separate the jelly beans into colors. This is a great way to get your child into a sorting activity and build basic math skills. Have her count the beans as she puts like colors into each cup.
 
Kids' art


2.     Add a few tablespoons of very warm tap water. Don’t use burning hot water, and always supervise your child. Don’t let her touch the water if it’s too hot.

Paint project

3.     Wait and watch what happens! Your child can also mix more than one color of jelly beans into each section of the cupcake tin. For example, blue and yellow beans melt to turn green.
 
4.     Paint the jelly bean water colors onto the paper. As the beans sit in the water, the color releases. Make an Easter egg, a spring flower or a piece of abstract art.
Spring flower


Are you looking for more Easter arts and crafts for kids? Follow my Pinterest board for ideas!
Follow 's board Easter Crafts for Kids on Pinterest.