Something interesting
happens when a child looks at art that doesn’t look like ‘art’ in the traditional
sense. In my experience (which I’m in no way generalizing to every child out
there) the kids who I’ve taught viewed abstract art through the lens of being
child-made. It looked so familiar to them, so much like what they create, that
they talked about it in very much the same way that they talked about each
other’s art. It was familiar – not foreign like a Renaissance ‘masterpiece’ or
19th century landscape.
I hear a lot
of, “Hey, I could have made that” or, “Yeah, my kid could have painted that”
when adults talk about abstract art. I don’t really ever have a good response
when it comes to what the difference is between a 4-year-old’s paint splatter
and an adult-made piece that’s worth millions and hangs on a museum’s wall. There
are all kinds of answers that range from, “Well, you didn’t think to paint that”
to, “The artist has a deep-seeded intentionality and there is an obvious
symbolism to the work” that I’ve heard others say in reference to these
questions of artistic creation. In many ways I think that an adult has to let
go and get that special freedom of thought (and creativity) that children have
back. The ability to create without fear and let art by art – without trading
the fun for finesse. In that respect, I’m big on letting children explore the
process and be abstract if they want to be.
All of that
said, sometimes ‘abstract art activities’ can become old hat. It’s yet another
Pollock splatter painting with temperas and thin brushes or the same old Picasso-esque
mixed-up face shape collage. I like to add a little something different (even
if it is just slightly different from the norm). This time I’m doing a paint
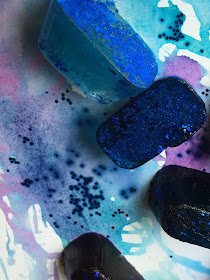
splatter, but with ice instead of the tempera/brush technique. It’s part
science, part art and all abstract. It also has a little something extra
special – glitter! If your child isn’t into the sparkly stuff (does any child
really not like glitter?), you can leave that out.
Here’s What
You’ll Need:
·
An
ice cube tray
·
Card
stock paper (or another thick paper)
·
Food
coloring
·
Water
·
Glitter
(optional)
Here’s What
to Do:
1. Drip a few drops of food coloring
into each compartment of the ice cube tray.
2. Add water.
3. Sprinkle the glitter in.
4. Freeze the paints.
5. When completely frozen, pop the icy
water colors out onto the paper. I suggest prepping for the mess by putting a garbage
bag or some other tarp-type barrier down on the work surface. You can also take
this frozen activity outside. If it’s warm out, the temperature speeds up the
melting process – making it easier to spread the color around.
6. Keep three or more cubes on the
paper.
7. Gently fold the ends of the paper
together. Don’t crease it, just make a curved cup.
8. Jiggle, toss and bounce the cubes around.
This splatters the paint and mixes the colors together.
9. Open the paper to see what the frozen
art looks like.
10. Repeat
if your child wants. Add more colors or keep the same ones on the paper.
Are you
looking for more kids’ art activities? Follow my Pinterest board for ideas!
Follow Mini Monets and Mommies's board Process Art for Kids on Pinterest.


I love these ice-painting ideas. Thanks for linking up with this week's #pinitparty and congrats on being this weeks featured pinned :)
ReplyDeleteYou should be careful when selecting research paper topics such that you pick a subject that you are interested in. If you have problems while this writing service will help you.taxi luchthaven
ReplyDeleteHi,I’m going to come back once again since I book-marked it. Money and freedom is the greatest way to change, may you be rich and continue to guide others.Eco-friendly Promotional gifts
ReplyDeleteSprunked Game scratch-based gameplay offers a fresh approach to music creation. I enjoy discovering hidden effects scattered throughout the interface, which sparks my creativity. The vibrant visuals and silly character designs keep me smiling, while the rich sound palette ensures endless possibilities. It’s truly an imaginative space for both beginners and pros.
ReplyDeleteThe platform provides alternate routes with Mapquest Directions estimated times and traffic conditions. Customization options include preferences for avoiding tolls, highways, and ferries.
ReplyDeleteI love using mapquest directions for weekend trips. It's so easy to plan my route, find cool places to stop along the way, and ensure I avoid any traffic hotspots
ReplyDeleteLa Pasta Fresca è un’importante base che mi ha tramandato mia nonna, uno dei ricordi che ho a questo proposito è il momento della acceleration city
ReplyDelete